Bulk Student Import
- 04 Jun 2024
- 4 Minutes to read
- Contributors


- Print
- DarkLight
Bulk Student Import
- Updated on 04 Jun 2024
- 4 Minutes to read
- Contributors
- Print
- DarkLight
Article summary
Did you find this summary helpful?
Thank you for your feedback
This article covers two use cases:
- Bulk upload of new students for a newly registered school. The main benefit is to save time for your teachers. Once the import of students is completed, your classroom teachers will have their roster of students loaded into their dashboard.
- Bulk update of information for existing students and/or adding new students to a grade level with current students already populated.
Import by Grade Level
Importing of students is done at each grade level. You won't be able to do a one-time import of all the students for all the grade levels. The CSV template we generate is unique for each grade.
1. New Student Import Steps
Step 1: Navigate to the current year Digital Data Wall and select Import Students.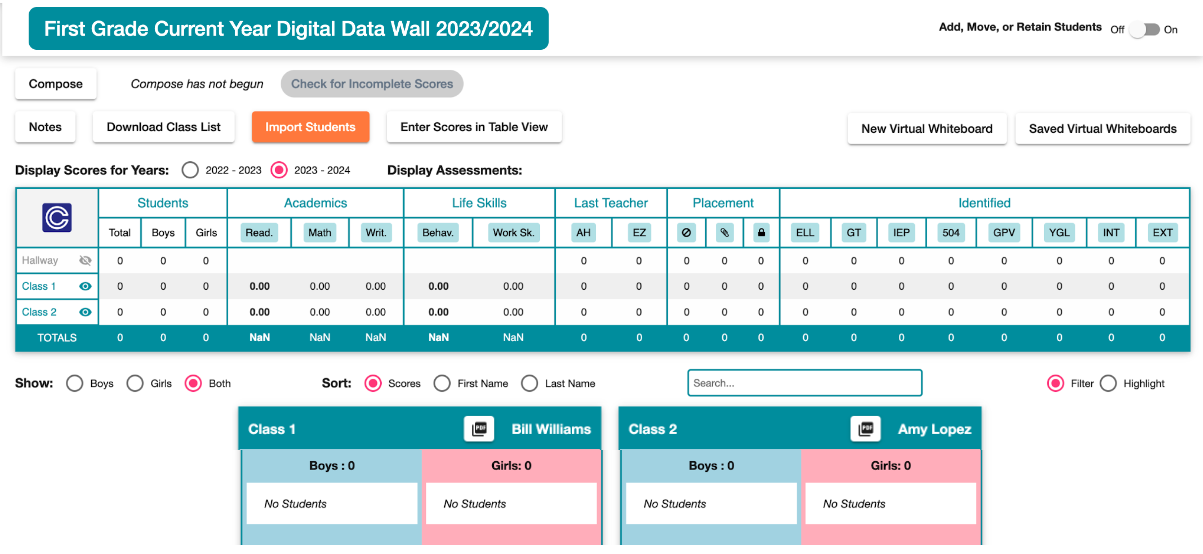

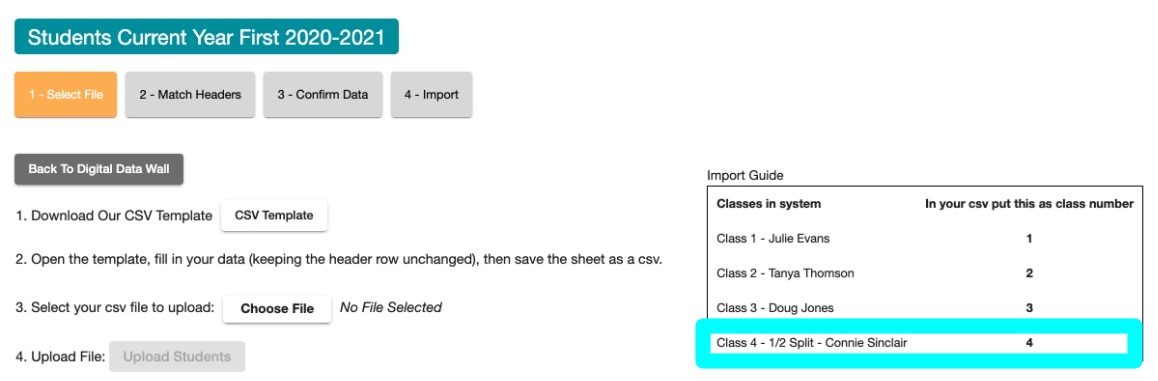
Step 2: From the Import Students screen select CSV Template.

Step 3: Download the CSV Template sheet to your computer.

The first row has example data as a guide.
Step 4: Replace this row, and the subsequent rows, with your student data.
Do not adjust the header row. Please take note of the formatting requirements: lower case m/f for male of female and yes for identifiers.
The required elements are: first name, last name, gender, and class number. You'll find the class number in the Import Guide table on the Import Students screen. See image above under step 2.

Add Unique Student IDs to Avoid Duplicates
We strongly recommend adding unique student ID numbers for each student. This will help ensure duplicate students aren't uploaded into the system. The ID numbers can be district generated or your own unique numerical system.

Here is an example of how the data should look when entered correctly. For the first student, Angela Walker, the reading, writing, math, behavior, and work skills scores are included. We recommend leaving these scores blank for the first upload so the classroom teachers, who know their students the best, can enter them on their dashboard.

Step 5: Save the sheet to your computer as a CSV.

Step 6: Select Choose File under Step 3.

Choose saved CSV sheet > Open.

The title of sheet should appear next to the Choose File button.

Step 7: Select Upload Students which will take you to the Match Headers step. In the column Include In Import you can select the optional data fields to include.

In the example below the student ID, the beginning of the year DRA scores, and some of the identifiers were chosen to be included in the import.

Select Continue which will take you to the Confirm Data step.

Step 8: Confirm the data before importing. If there are any errors they will be highlighted in red. Correct the errors or start over by editing your CSV sheet. If everything looks correct, select the green Import button.

As the admin, you should see the imported students represented as Student Cells on the Digital Data Wall.
 When your classroom teachers log in to their dashboard the roster will be loaded. In the example below, first grade teacher Amy Lopez logged in and selected Amy Neels to assess. Amy Neels' GPV identifier and her beginning of the year DRA assessment score are already loaded.

2. Update Student Import Steps
Student IDs are Required to Prevent Duplicates
Before updating ensure all your students have ID numbers entered in the Student Card. If not, go into the Enter Scores in Table View to insert ID numbers THEN follow the directions below to update student information through a CSV sheet.
Assessment Data Loss Warning!Be sure to include all the assessment score data (beginning of the year, mid-year, and end of the year) in the sheet AND select those columns to be included at the confirmation step.
Including just the data you want to update will result in existing assessment data being deleted. As an example, if the beginning of the year scores are already present for all your students and you're uploading the mid-year scores, not including in the sheet the beginning of the year scores, and not selecting that column during the confirmation step, the beginning of the year scores will be deleted.
TestIf this is your first time doing an update, we recommend doing an update with a few students. Once this first test is successful, repeat with the full number of students. Enter Scores in Table ViewAs an alternative you can use our Enter Scores in Table View feature to update student information.
Assessment Data Loss Warning!
Be sure to include all the assessment score data (beginning of the year, mid-year, and end of the year) in the sheet AND select those columns to be included at the confirmation step.
Including just the data you want to update will result in existing assessment data being deleted. As an example, if the beginning of the year scores are already present for all your students and you're uploading the mid-year scores, not including in the sheet the beginning of the year scores, and not selecting that column during the confirmation step, the beginning of the year scores will be deleted.
Test
If this is your first time doing an update, we recommend doing an update with a few students. Once this first test is successful, repeat with the full number of students.
Enter Scores in Table View
As an alternative you can use our Enter Scores in Table View feature to update student information.
Step 1: Navigate to the current year Digital Data Wall and select Import Students.
Step 2: From the Import Students screen select CSV Template.
Step 3: Download the CSV Template sheet to your computer.
Unlike the New Student Import, the sheet will include the students currently in that grade level.
Step 4: Adjust the data in the sheet leaving the header row untouched.
- Move students into other classes by changing the class number.
- For students who have left your school, enter 0 in the class number column to move them to the Hallway. From the Hallway the students can be Archived.
- Update scores including Assessment scores.
- Add new students.
Step 5: Save the newly modified sheet as a CSV.
Step 6: Select this newly saved file to import.
From here you will follow the same flow described in the New Student Import section.
Split Class Student Import
When importing students for a current year split class:
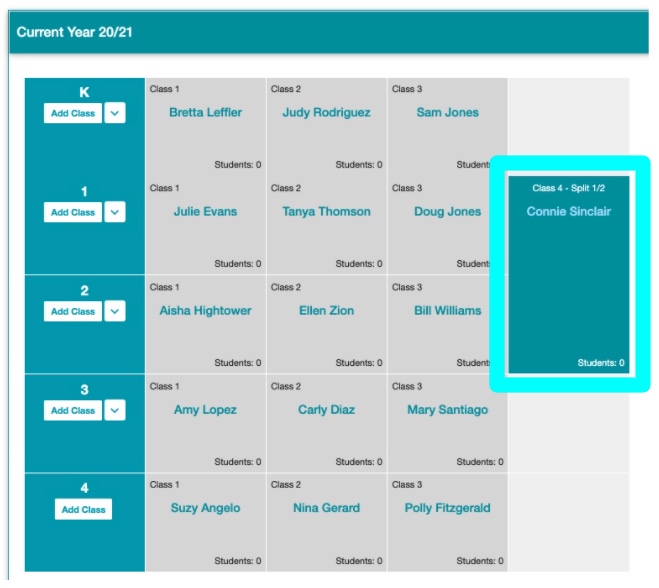
- Go to the current year Digital Data Wall and select Import Students. You will see the class number assigned to the current year split class. The images below show Connie Sinclair who has a split 1/2 class (Class #4).
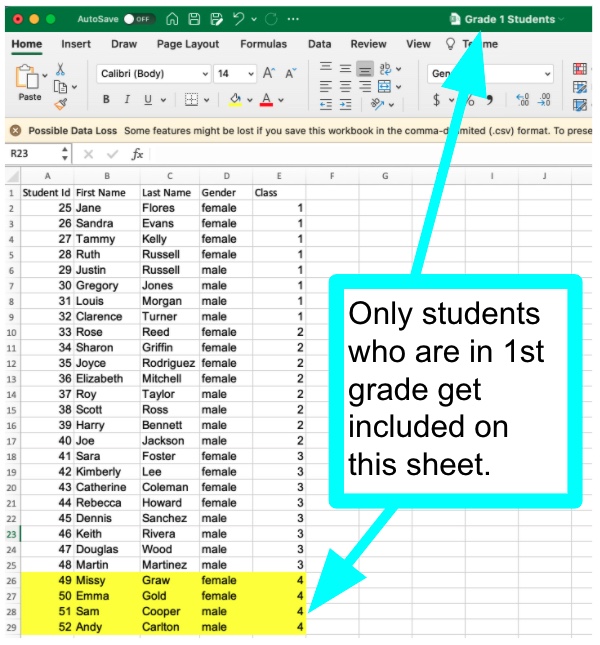
- Select CSV Template. In the CSV sheet you would only input students who belong to this grade level. Students who are in Connie's class who are truly 2nd graders wouldn't be included here.


After the import has been completed you will see the students in the 1st grade current year Digital Data Wall.
Follow the same steps to import the 2nd grade students for Connie's class in the 2nd grade CSV sheet. Now when Connie logs into to her teacher dashboard the students will have the correct grade level designation.
